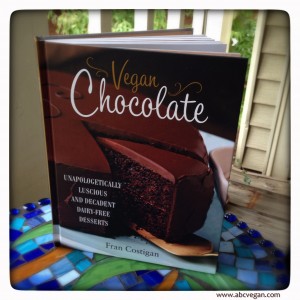
 Who doesn’t love chocolate?? And impressing one’s family and friends with the amazing creations you can make?! Fran Costigan‘s new book Vegan Chocolate: Unapologetically Luscious and Decadent Dairy-Free Desserts allows you to do just that. I was lucky enough to receive a copy to try last Fall, and now you can win one too! Read on for the details. :)
Fran’s book is nothing short of incredible. If you want to make cookies, truffles, cakes, pies, drinks (alcoholic and non!), puddings, or frozen desserts, it’s all there. The directions are easy to follow, so even the big fancy recipes turn out to be a breeze. Don’t tell anyone that when you serve them the big fancy cake though – let them think you slaved all day! :D
Fran starts with an introduction to ingredients, sweeteners, chocolate, and equipment, so you will be prepared for everything you will come across in the book – and it also serves as a thorough introduction to vegan baking in general. If you’ve ever been scared off – how do I make a cake without eggs?! – now’s your chance to get started and banish that fear forever.
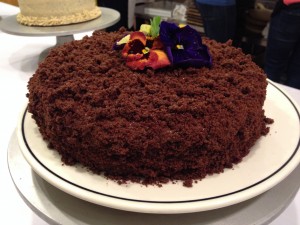
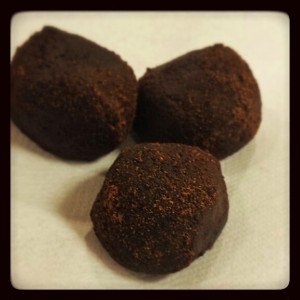
For example, I made the Brooklyn Blackout Cake (recipe below!) for an omnivore’s birthday party, and he declared it the best cake he’s ever had. EVER. Win! Not only that, it’s a 3 layer cake iced with pudding and a crumb topping so it seemed like a huge endeavor going in, but it could not have been easier. I’ve also made the Aztec truffles, the gluten free version of the Chocolate Cake to Live For, and the Chocolate Hazelnut Butter (Not-tella), and everything has been nothing short of delicious. It seems like with this book you just can’t go wrong!
So are you ready to win a copy and try it out for yourself?? :D The publishers have been kind enough to provide a copy for one lucky reader. Tell me in the comments what special occasion you would use it for, or what special person you would treat with a creation from the book – even if that is treating yourself! For additional entries, sign up for my mailing list (use the easy box over there in the right sidebar to receive your protein primer —-> :) ) and/or like me on facebook (also in the right sidebar!), and leave a separate comment telling me you did each of them. A winner will be picked randomly on Wednesday, May 7th at 9AM, and will have 48 hours to claim their prize – so just in time for a promised Mother’s Day gift. :) U.S. residents only please. Congratulations to Jenn!! :)
For more deliciousness from Fran, find her on facebook or on her website, and tell her I said hi! :)
(PS – bonus for you chocolate lovers – the next giveaway coming up soon will be for a 4-pack of delicious Salazon chocolate – keep your eyes out!! :D )
My family moved from Brooklyn to Long Island when I was five years old, but I have vivid memories of my father regularly travelling back to Brooklyn to buy the famous Ebinger’s Bakery Blackout Cake we all missed eating. I still miss it today. It is etched into my memory as the most perfect chocolate cake in the entire world. And I am hardly alone in my adoration of this iconic cake, which is named after the World War II blackouts. The all-chocolate Blackout Cake was composed of three fudgy layers, each slathered with a rich and creamy chocolate pudding, frosted with the same pudding, then showered with chocolate cake crumbs made from a fourth layer. As wonderful as it sounds, it tasted even better. When I set about creating a vegan version, I knew it had to be a perfect rendition for the New Yorkers—especially Brooklynites—who grew up eating this beloved cake. I am proud to say I’ve served this cake to friends who were Ebinger fans and Brooklyn natives, and they all swear it is as good as the original.
This showstopper of a cake is easy to assemble, requiring only that creamy chocolate pudding be spread between the layers and on the sides and top. There’s no need to be fussy about smoothing the pudding, since it’s the thick covering of crumbs that creates the final “WOW!” The cake layers can be made ahead and frozen, and the pudding can be made a day ahead and refrigerated in a covered container.
Note: I think this cake tastes best with natural cocoa powder. If you cannot find natural cocoa powder where you live, you may use Dutch-process cocoa powder, just substitute 1 teaspoon baking powder and 1 teaspoon baking soda for the 2 teaspoons baking soda.
Ingredients
- 2 cups / 414 grams organic granulated sugar
- 11?2 cups / 198 grams organic whole wheat pastry flour
- 11?2 cups / 193 grams organic all-purpose flour
- 2?3 cup / 50 grams natural cocoa powder (non-alkalized; see note about using Dutch-process cocoa powder)
- 2 teaspoons / 10 grams baking soda
- 1 teaspoon / 5 grams fine sea salt
- 2 cups / 480 ml water, at room temperature
- 2?3 cup / 160 ml mild tasting extra-virgin olive oil or organic neutral vegetable oil
- 3 tablespoons / 45 ml pure maple syrup, Grade B or dark amber
- 2 tablespoons / 30 ml apple cider vinegar
- 1 tablespoon / 15 ml pure vanilla extract
- 1 teaspoon / 5 ml chocolate extract (optional)
- 2 recipes Almost-Instant Chocolate Pudding (below), cooled
Instructions
- Position a rack in the middle of the oven and preheat to 350?F / 180?C. Oil the sides and bottoms of two 9 x 3-inch / 23 x 7.6-cm round cake pans. Line the bottoms with parchment circles. Do not oil the paper.
- Place a wire mesh strainer over a large bowl. Add the sugar, whole wheat pastry flour, all-purpose flour, cocoa, baking soda, and salt to the strainer and stir with a wire whisk to sift the ingredients into the bowl. (If any small bits remain in the strainer, add them to the mixture in the bowl.) Whisk to aerate the mixture.
- Whisk the water, oil, maple syrup, vinegar, vanilla, and chocolate extract (if using) in a separate medium bowl until completely combined. Immediately pour into the dry mixture and whisk until the batter is smooth.
- Divide the batter between the 2 pans. Rotate the pans to level the batter and tap them lightly on the counter to eliminate air bubbles.
- Bake on the middle rack for 30 to 35 minutes, or until the tops of the cakes are set, the sides have started to pull away from the pan, and a wooden toothpick or skewer inserted into the center comes out clean or with just a few moist crumbs.
- Set the cakes on wire racks. After 5 minutes, run a thin knife around the sides of each cake to release the sides of the cake from the pan. Invert each cake onto a rack. Remove the pans and carefully peel off the parchment paper. It is fine to cool the cakes bottom side up.
- When the cakes are completely cool, slide a 9-inch cardboard cake circle under each one. Wrap the layers with plastic wrap and refrigerate for about 1 hour, or until cold.
- Use a long serrated knife to slice each cake layer in half horizontally to form four layers. Crumble one of the layers into a food processor. Pulse the processor a few times to make medium-size crumbs, but stop before they get too fine. Pour the crumbs into a bowl.
- Line a rimmed baking sheet with parchment paper. Place one of the remaining three layers, still on the cake circle, on the baking sheet. Spread with a scant cup of the pudding. Place a second cake layer on the pudding, board side up. Remove the board and spread the layer with another scant cup of pudding. Slip the board under the last layer and invert it onto the cake. Spread with another scant cup of the pudding. Refrigerate the cake and remaining pudding for 20 minutes. (It is easier to finish a cold cake.)
- Cover the sides of the cake with the remaining pudding. Sprinkle the top and sides of the cake liberally with the cake crumbs, completely covering the pudding. Pat the crumbs lightly to make sure they adhere. Use all the crumbs, even the ones that fall onto the paper.
- It's best to serve this cake within 24 hours, but it will hold up for a day in the refrigerator. It is not necessary to wrap the cake.
I grew up eating my mom’s chocolate pudding from a boxed mix. It was a bit lumpy and thick, with rubbery chocolate pudding skin (I have permission from my dear mother to tell this story), but it was warm and chocolate and homemade, and I liked it. On the East Coast there was only one brand worth knowing: My-T-Fine, the premium pudding. It wasn’t exactly instant, since the mix had to be cooked with milk, and somewhere along the way Mom decided cooking pudding and washing the pot was not worth the effort. We moved over to Jell-O brand—really instant pudding: put the mix in a bowl, add milk, and mix with a rotary egg beater. Still, if the bowl wasn’t deep enough (especially if I was doing the mixing) it spattered, and then there were still beaters to wash. And the finished pudding was cold! That’s why I love this recipe so much: in the same time it took my mom to make sad chocolate pudding, you can make Almost-Instant Chocolate Pudding that is real chocolate pudding the way we always wanted it to be: warm, thick, and chocolaty.
Note: The cornstarch is crucial to get the right texture for this pudding. Using another starch thickener, such as my usual first choice arrowroot, would result in pudding with a soft and unpleasant texture.
Ingredients
- 1?2 cup / 111 grams organic granulated sugar
- 1?4 cup / 28 grams organic cornstarch (do not use arrowroot, see Note)
- 1?4 cup / 25 grams Dutch-process cocoa powder
- 1?4 teaspoon fine sea salt
- 11?2 cups plus 6 tablespoons / 450 ml vanilla soymilk, vanilla almond milk, or vanilla coconut milk beverage
- 11?2 ounces / 43 grams dark chocolate (59 to 62%), chopped into small pieces
- 1 teaspoon / 5 ml pure vanilla extract
Instructions
- Sift the sugar, cornstarch, cocoa powder, and salt through a wire mesh strainer into a medium saucepan. Slowly stir in the milk. Keep stirring until no trace of any of the dry ingredients is visible. The idea is to make sure the cornstarch is completely dissolved before you turn on the heat.
- Cook over medium-high heat, whisking frequently, until the mixture begins to thicken and is close to a boil. This can take as long as 12 minutes. Adjust the heat as needed to get a full boil, but don’t let it be so high that the bottom scorches. As soon as the pudding starts to boil, it will thicken to pudding consistency. Immediately lower the heat and boil gently for another minute, stirring frequently with a silicone spatula.
- Remove the saucepan from the heat. Gently stir in the chocolate with the silicone spatula until the chocolate is melted and incorporated.
- Stir in the vanilla.
- Spoon the pudding into a bowl. It will be set and ready to use in about 30 minutes at room temperature, but it can be refrigerated for up to 24 hours. If you refrigerate it, cover the surface with plastic wrap, making sure the wrap adheres to the pudding to prevent a skin from forming.
Recipes reprinted with permission from VEGAN CHOCOLATE © 2013 by Fran Costigan, Running Press)


I’m an email subscriber.
I like you on Facebook. FB name: Terri Jones Cole
I would use this book to make spectacular desserts to WOW the skeptical omnis in my life! Thanks for the chance to win!
Subscribed to your e-mail list.
Just “liked” A,B,C Vegan on Facebook!
I would make the pudding for my wedding anniversary.
I am following you on Facebook.
There are so many special occasions this book would be perfect for!
I would definitely make something for my mom!
I like you on FB!
Just signed up for your email list and liked you on FB!
I would make myself the gluten free chocolate cake to live for – love that name – for an end of semester treat!
I like you on facebook!
My birthday just past, but I’d love a birthday treat from this book!
my birthday cake of course!
I also signed up for your mailing list
I would use the cookbook for EVERYDAY occasions and for myself !!! I LOVE chocolate !!!! THe Almost Instant Chocolate Pudding sounds GREAT !!!
I forgot that I’m pretty sure I met you on Saturday at the Baltimore Veg Fest! I had one of your dark chocolate cupcakes – that fudge frosting was really tasty!
Lol, I tweaked it a little, but that frosting is from the book!!! :D
So glad you’re visiting my corner of the world after we met. :)
I joined your mailing list!
I liked your page on Facebook!
I would make things for my coworkers, who make treats all the time but they’re almost never vegan, so I want to show them how tasty it can be to eat kind!
My mom is a chocoholic…she loves dark chocolate! I think this book would be perfect for Mother’s day. Maybe there’s something in there I could make her for an extra-special mother’s day breakfast :)
Question, do you announce the winners on your blog or do you use email?
I will email the winner on Wednesday!
Oh, that’s easy – I would make chocolate goodies to bring to my coworkers, in my neverending quest to feed them delicious vegan things :)
I have that cookbook, but would love to have a second copy for someone who is becoming a vegan and loves chocolate!
Followed on Twitter & FB.
Signed up for your mailing list!
I signed up for your mailing list!
I would use this book for our weekly potlucks, dinner parties, or just a weeknight treat (why not?)!
I signed up for your mailing list
I followed you on facebook
I would use the cookbook to make some treats for myself hehehe :-)
Always a good choice! :)
Hey Jenn if you see this, I emailed you to say you WON! :D But I haven’t heard back from you. :( Pls email or post by 5PM tonight to claim your prize! Or I will have to move onto the next winner, but I hope that’s not the case!! :)
I would share one of my chocolate creations with my mother who probably loves chocolate nearly as much as me!
Perfect for Mother’s Day!
As a mother and grandmother (Of 4), and all love chocolate, I get your family!! Good luck!!
I come from a family of chocolate lovers. So if I won this book, I would probably bake a cake for my sister’s birthday that is coming up in a few weeks!
Nice! I recommend the Brooklyn Blackout Cake – seems to work wonders for birthdays in my experience! And that recipe you even already have below. :D
Excellent idea this giveaway of yours!! I would say I would treat myself constantly but how much fun is it to feed your “omnivorous” friends impossibly delicious vegan food then see the look of disbelief on their faces after you tell them it’s 100% vegan.
Ha, so much fun. You happy you have the recipe now? ;)
Vegan Chocolate book recipes will covert omnis. Ask Esther!
I would love a copy of this recipe book. I’ve been vegan for 1 year now and I haven’t figured out how to do good desserts yet. It would be nice to have a few desserts in my repertoire that my family loves that I know are better for them.
Aw, that’s awesome, this book would be perfect to help you with that!
I second what Esther said and add – I’m over 20 years vegan and truth is vegans have birthdays, anniversaries, holidays too!
I LOVE chocolate, can’t get enough of it. I’m also vegan. My lovely mother has been so kind to try to find new chocolate vegan recipes for me and make them in her spare (not so spare) time. She also goes to all of the vegan fests nearby with me and on other vegan adventures. I would love to win this book so I can make my own chocolate recipe and bring it to her for our Mother’s day lunch.
Aw, that’s so sweet! Thank your mother for me for being so wonderful! And yourself for being so wonderful right back!
AWWWW!!!! <3
Pretty much the only sweets I indulge in are those that are chocolate–otherwise, why bother? So, a chocolate cookbook that is vegan and uses organic, natural ingredients sounds like my idea of perfection.
So what special occasion would I use it for??? The easier to answer question is what special occasion wouldn’t I use it for, as every occasion I know can use a little chocolate. And I can envision that there will be plenty of nonspecial but just when my daughters or I want a treat occasions as well.
Sounds perfect!
There are both everyday and special occaisions recipes in Vegan Chocolate. The cake on the cover was my 6 year old granddaughter’s birthday cake- by choice. She tasted it when I made the book trailer in her home!
I checked out my library’s copy of “Vegan Chocolate” and also had the pleasure of meeting Fran, who is a riot. Her pastry skills are on par with her wit. So since I can’t have Fran at arm’s length, if I had my own copy of “Vegan Chocolate”, I’d make the mint chocolate chip ice cream and serve it to my family. Because they deserve better ice cream than the junky Breyer’s stuff my husband keeps bringing home!
Mmmmm, I’m going to be out in the sun on this warm day and now I want ice cream. :D Fran’s awesome isn’t she? :)
Sara, you are adorable. We had a good time, didn’t we, at Karyns Raw in Chicago!! I want you to make the Mint Chocolate Chip Ice Cream and serve it with the minute to make, 2 ingredient Chocolate Magic Shell! Come over to the light side!!